With the right software, hardware and settings, getting CP/M running on a RC2014 is very easy. This post is a guide to doing just that. It assumes you are already familiar with the RC2014 and have built and tested your RC2014 running BASIC.
Required hardware
- Z80 CPU Module
- Serial I/O Module (68B50 or 63B50 ACIA)
- Clock Module (7.3268Mhz assumed)
- Pageable ROM Module
- 64K RAM Module
- Compact Flash Module
- Backplane
Optional Hardware
- Backplane Pro
- Pi Serial Terminal
Software
Both the Pageable ROM Module and the Compact Flash Module are available with the CP/M Monitor pre-programmed on to ROM at 0x8000.
The Compact Flash Module is also available with a pre-programmed 128mb compact flash card which contains CP/M as well as the essential software required to get you up and running
Settings
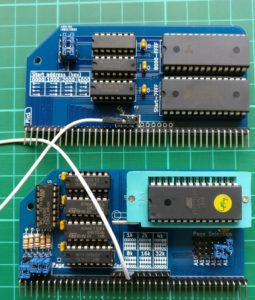
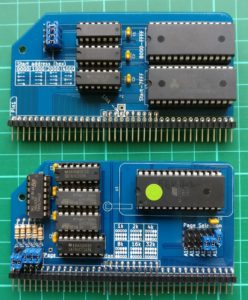
The 64k RAM Module needs to be set to full 64k (ie start address at 0x0000) and in pageable mode. For this, all 4 jumpers need to be set to the right hand settings as shown below. If you soldered a link where indicated by the silkscreen, this needs to be remove as this is the page pin
The Pageable ROM Module needs to be set for an 8k page and starting at 0x8000. See photos below for details.
The Page Pin from the ROM needs to be connected to the Page Pin on the RAM. If you have the Backplane Pro and have installed the double header pins supplied with that then nothing further needs to be done. If you are using a Backplane 8, however, you will need to add a jumper cable between the 4th pins on the 10 pin Enhanced Bus header. See the photos below to illustrate either scenario
Then it is simply a case of installing all the modules (if using Backplane 8 ensure you have links between slot 2&3 or 6&7 so you can use the outer slots), connecting FTDI cable or monitor & keyboard if you are using the Pi Zero Terminal, inserting the compact flash card and applying power.
[On power up, a small bootloader will copy itself and a modified CP/M console from 0x0000 (ROM) up to 0xA000 (RAM), then page out the ROM and page in the lower 32k RAM, then copy Grant Searles CP/M Monitor (as modified by Mitch Lalovie and tweaked by me) back to 0x0000 (RAM) and run the monitor from there]
You will be greeted by a “Press [space] to activate console” message, and after pressing space you will be in to the monitor.
(Note that the B option for BASIC will not work with this hardware set up. If you want to use BASIC, either set the A15 Page Selection jumper to 0, or download a copy of mbasic to CP/M)
Press X followed by Y and it will boot CP/M from the compact flash card and you will be at the A> prompt.
The compact flash card is pre-formatted with 16 drives from A: to P: The A: drive has DOWNLOAD.COM which is needed to transfer files on to the CF card. Drive C: has CP/M utilities such as TYPE.COM ED.COM, STAT.COM etc.
To copy files and programs on to the CF card you will need to connect to your RC2014 over a FTDI cable, and either use Grant Searles Windows File Packager or manually package the files with a text editor. When copied over the FTDI connection it will initiate A:DOWNLOAD.COM which will then take the file and put it on to the current selected drive. Note that the flow control on the 68B50 is minimal with this setup, so a 1ms delay between characters is suggested to give consistently successful results.
After that, I highly recommend using a torch otherwise you will almost certainly end up being eaten by a Grue


