The RC2014 Mini II CP/M Upgrade Kit provides the extra circuitry needed to run CP/M on the RC2014 Mini.

This page is for the RC2014 Mini II CP/M Upgrade Kit. For the original RC2014 Mini CP/M Upgrade Kit please refer to this page

Find the assembly guide here
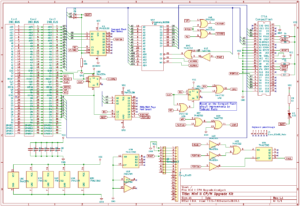
The 4 layer PCB hosts 32k RAM, paging control and compact flash circuitry, compact flash socket and 2 expansion headers (one Standard Bus, the other Standard or Enhanced Bus) for further expansion. This sits as a mezzanine board above the RC2014 Mini and connects via the RC2014 bus.
Unlike the original Mini CP/M Upgrade Kit, the Mini II retains all of its features and ICs, including the ROM which already has CP/M in the 16k Bank 2 and Bank 3.
The paging function is carried out by the 74HCT138 which uses A3-A7, M1 and IORQ to detect a write to Port 48 or 56. When a write to Port 48 or the reset line is invoked, the counter on the 74HCT393 is reset, which disables the lower RAM and enables the ROM. A write to Port 56 will increase the counter on the `393, toggling Q0, and paging out the ROM and enabling the lower RAM
The control circuitry for the compact flash card is based on the improvements made to the original CF module by Tadeusz Pycio. See the Compact Flash v2 page for details.
Two expansion headers can be fitted to the top of the CP/M Upgrade Kit. This effectively turns the board in to a two-slot backplane. Any of the RC2014 modules designed for the Standard Bus can be plugged in to either of the expansion headers, ensuring that Pin 1 lines up on both boards. The left hand slot also passes through the Enhanced Bus signals from the Mini II, so Enhanced Bus modules can be used here. Note that because the Mini II only has a single serial port, so despite the pins for Tx2 and Rx2 appearing on the Enhanced Bus header, there are no signals present. If additional expansion is needed, a Backplane-5, Backplane-8 or Backplane Pro can be used. (Top tip – a Backplane-5 will fit directly above the Mini-CP/M stack if a pin header is fitted on the underside of the Backplane 5, giving you 4 effective free slots!)
If you used a Universal Micro Keyboard with your RC2014 Mini II, then this this can be fitted on top of the CP/M Upgrade Kit via a 6 pin long header. Although this is soldered to the Upgrade Kit, there is no electrical connection to anything else on that board. Note that this will block access to the expansion headers from above, but if right-angled headers are used, this is not a problem.
Running CP/M
Set the jumper on the RC2014 Mini II to 16k Bank 2, insert the compact flash card, connect a FTDI cable to the 6 pin header on the RC2014 Mini II, and set your terminal software to 115,200 baud, 8-n-1

[On power up, a small bootloader will copy itself and a modified CP/M console from 0x0000 (ROM) up to 0xA000 (RAM), then page out the ROM and page in the lower 32k RAM, then copy Grant Searles CP/M Monitor (as modified by Mitch Lalovie and tweaked by me) back to 0x0000 (RAM) and run the monitor from there]
You will be greeted by a “Press [space] to activate console” message twice, and after pressing space you will be in to the monitor.
(Note that the B option for BASIC will not work from this ROM bank. If you want to use BASIC from ROM set the jumpers to Bank 0. A better solution though is to download a copy of mbasic or BBC Basic to CP/M, which then allows you to use the compact flash card for storage)
Press X followed by Y and it will boot CP/M from the compact flash card and you will be at the A> prompt.
A 128mb compact flash card is pre-formatted with 16 drives from A: to P: A 64mb card has 8 drives from A: to H: The A: drive has DOWNLOAD.COM which is needed to transfer files on to the CF card. Drive C: has CP/M utilities such as TYPE.COM ED.COM, STAT.COM etc.
To copy files and programs on to the CF card you will need to connect to your RC2014 over a FTDI cable, and either use Grant Searles Windows File Packager use the online file packager, or manually package the files with a text editor. When copied over the FTDI connection it will initiate A:DOWNLOAD.COM which will then take the file and put it on to the current selected drive. Note that the flow control on the 68B50 is minimal with this setup, so setting a 1ms delay between characters in your terminal software is suggested to give consistently successful results.
After that, I highly recommend using a torch otherwise you will almost certainly end up being eaten by a Grue!
Bill of materials
1 RC2014 Mini II CPM PCB
1 Compact Flash Socket
1 28 pin wide DIL socket
2 16 pin narrow DIL socket
5 14 pin narrow DIL socket
2 40 way SIL socket
1 20 way SIL socket
1 40 pin header
1 10 pin header
1 6 pin long socket
4 M3 Nylon 11.13 Spacer
4 M3 Nylon nut
4 M3 Nylon 20mm
1 Green 3mm LED
2 1N4148
5 1k resistor
1 10k resistor
6 100nf
1 74HCT04
1 74HCT393
2 74HCT32
1 74HCT74
2 74HCT138
1 62256 RAM
1 Compact Flash 128mb or 64mb